Translate

Monday, 4 August 2014

How to view hidden files in USB drive

To view Hidden files on usb pendrive 


Click on "Start" -->Run --> type cmd and press Enter. 
Here I assume your pendrive drive letter as G: 
Enter this command :attrib -h -r -s /s /d g:\*.* 
You can copy the above command --> Right-click in the Command Prompt and paste it. 
Note : Replace the letter g with your pen drive letter.
Now check for your files. 

Tuesday, 1 July 2014

Create your own run commands


Steps to Create run commands of your own

Step 1: The first step is to select the software or application for which you want to make custom Run command. For example, let us consider Google Chrome as the example here. Remember, you can choose any application other than which is already there in the Run command.

Step 2: In the second step, right click on the desktop of your computer system and make a new shortcut.
Right click > New > Shortcut

Step 3: As you select the Shortcut option in the 2nd Step, it will open up a dialog box. And, the dialog box will ask you path of the application or software for which you want to create the Run command.

Step 4: Now, you need to browse through the files and choose the one that shows “chrome.exe”. Well, it is quite obvious that all the executable files can be found in the C drive (or wherever the Operating System has been installed), inside the folder “Program Files”. For example, “C:\Program Files\Google Chrome\chrome.exe

Step 5: Once you are done with Step number 4, just click on “Next” button and simply provide a relative name to that shortcut. Remember, the same name will be used later in the Run command.
For example, “GC” for Google Chrome

Step 6: Now, click on the “Finish” button. Once it is done, an icon related to that application or software will show up on your computer’s screen. It means that the process of creating shortcut has been done successfully.

Step 7: In this step, just cut and paste that recently made shortcut icon into your computer’s root drive, in its Windows folder.
For example, C:\Windows, Make sure you are the administrator of the computer or have its password.

Step 8: Now, you are done with the set up and can run the application through Run Command. Just go to Run and enter the keyword “GC”, and Google Chrome will begin executing.


VLC: Fix unsynced audio and subtitles


Fix unsynced audio and subtitles In the popular media player VLC, if your audio loses sync with the video or subtitles, there is an easy way to fix this. Simply pressing J or K will move the audio forward or backwards. Similarly, to sync the subtitles you can press H or G.


Hide Files or Folders Using Command Prompt

Hide Files or Folders Using Command Prompt


For that you need to follow the following instructions:
  1. Press windowkey+R : Run command dialog box appears.
  2. Now type "cmd" and hit enter. A command prompt window displays.
  3. Now type "attrib +s +h E:\collegephotos" and hit enter.
  4. The folder "collegephotos" will be hidden (Note: It cannot be viewed by any search options)

    (To view this folder again, use the same command but replace '+' with '-' on both flags 's' and 'h')
  5. To unlock Type "attrib -s -h E:\collegephotos"

Convert Any Document or Web Page to PDF

Convert Any Document or Web Page to PDF

Somebody just told you that you need to have Adobe Acrobat (Writer) to create a PDF file? Guess what, you can get away from that pricey piece of software if you just need to convert some documents to pdf, without a need of fancy editing the pdf document.
Here's how. Thanks to the BullZip, who provides a Free Pdf printer. With this free tool, you can simply "print out" your document or webpage to a pdf file, just about the same way as you print it out to a printer.
You can visit BullZip.com for more information about the software.

Here the direct link to BullZip downloads page: Downloads
  1. To get started, first follow the link above and download Free Pdf Printer from BullZip, then install it to your computer.
  2. Once you're done, you might need to close the program (or the web browser) which you're currently viewing the document. This helps refreshing the list of available printers on your computer.
  3. Once you get back to the document you want to convert, perform the same steps are you print out the document, i.e. File > Print ...
  4. When you see the Print window pop-up, select "Bullzip PDF Printer" under "Printers", then click "OK".
  5. BullZip PDF Printer will then start to analyze your document and display a new pop-up window, where you can direct it to the location you want to save the pdf file.
  6. Follow the pop-up windows. The PDF document is created!

Saturday, 17 May 2014

Save a Web Page as a PDF with Just One Click

Save a Web Page as a PDF


1. Start your web browser
2. Open a website or stay on a web page
3. Select from main menu "File"->"Print" or press "ctrl+p"
4. Select Destination as "Save as Pdf"
5. Click "OK"
6. Congratulations! You have saved web page to PDF document now.
Eg:


Wednesday, 19 March 2014

How to create "Wifi Hotspot" through Command Prompt in Windows 7/8

To create "Wifi Hotspot" through Command Prompt in Windows 7/8

Step 1: Click Start Menu
Step 2: Type cmd in Search Box then  right click "cmd" and Run as Administrator


Step 3: Type the following commands
                netsh wlan set hostednetwork ssid=john key=12345678 
-->enter
          (SSID is ur network name and key is your password (Must be 8 char or digit))


               netsh wlan start hostednetwork -> enter


Step 4: Go to Control Panel--> Network and Sharing Center-->Click your current Internet                            Connection and click properties.
           

Step 5: Go to Sharing tab enable  the following check box-> click ok


Step 6:Click the "Select a Private Network connection-> then select Your network connection->ok

Step 7: Now you have successfully created the wifi hotspot and your internet is ready to share.


Step 8: Now you search for wifi network on another device and enter password what u have given                already.

TO STOP A WIFI HOTSPOT :

Run the cmd as Administrator and Type the following commad :

                 netsh wlan stop hostednetwork  -->enter


Now Your wifi Hotspot stopped. Njoy

Sunday, 2 March 2014

To Hide a Folder using "Batch File"

To Hide a Folder using "Batch File"


Code for the batch file:

cls
@ECHO OFF
title Folder Private
if EXIST "Control Panel.{21EC2020-3AEA-1069-A2DD-08002B30309D}" goto UNLOCK
if NOT EXIST Private goto MDLOCKER
:CONFIRM
echo Are you sure you want to lock the folder(Y/N)
set/p "cho=>"
if %cho%==Y goto LOCK
if %cho%==y goto LOCK
if %cho%==n goto END
if %cho%==N goto END
echo Invalid choice.
goto CONFIRM
:LOCK
ren Private "Control Panel.{21EC2020-3AEA-1069-A2DD-08002B30309D}"
attrib +h +s "Control Panel.{21EC2020-3AEA-1069-A2DD-08002B30309D}"
echo Folder locked
goto End
:UNLOCK
echo Enter password to unlock folder
set/p "pass=>"
if NOT %pass%== PUT_YOUR_PASSWORD_HERE goto FAIL
attrib -h -s "Control Panel.{21EC2020-3AEA-1069-A2DD-08002B30309D}"
ren "Control Panel.{21EC2020-3AEA-1069-A2DD-08002B30309D}" Private
echo Folder Unlocked successfully
goto End
:FAIL
echo Invalid password
goto end
:MDLOCKER
md Private
echo Private created successfully
goto End
:End

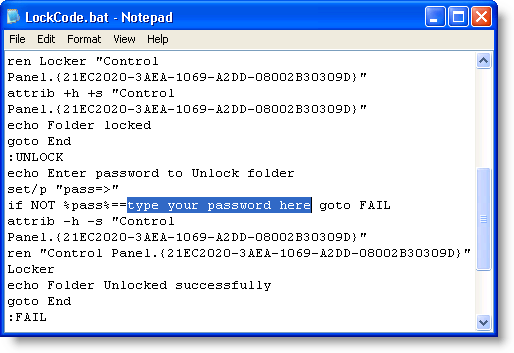
Open the file in Notepad. Replace “type your password here” in the LockCode.txt file with the password you want to use to lock and unlock the protected files and folders. DO NOT forget this password. Save the file as LockCode.bat.

Text of LockCode.bat file
You should now have two files: LockCode.txt and LockCode.bat. If you cannot tell which file is which because the file extensions are not displaying, Folder Options from the Tools menu->view tab
Now you should be able to see the extensions for both files.
Double-click on the LockCode.bat file to create a new folder named Private. The new folder is created in the same directory as the LockCode.bat file.
Place any files and other folders you want to protect into this Private folder. Double-click the LockCode.bat shortcut on the desktop again to lock the Locker folder. You are asked if you are sure if you want to lock the folder. Type a Y if you are sure you want to lock the folder. The folder disappears.
Confirmation of locking the Locker folder
To unlock the Locker folder again, double-click on the LockCode.bat file. You are asked to enter your password.
Enter password
The folder is available again.

Extra:
// To make this a more secure option for locking files and folders, once you have locked the Locker folder, open the LockCode.bat file in Notepad and remove your password. You may either leave it blank or enter a dummy password. Only when you are ready to unlock your files and folders, should you open theLockCode.bat file again and re-enter your password and save the file again.
Then, you can double-click on the LockCode.bat file to unlock the Locker folder. If you don’t take this precaution, anyone can open your LockCode.bat file and view your password.
To open a .bat file in Notepad, you must open Notepad first. If you double-click on the file like you would if you were opening a text file, the file runs instead of opens.
Once Notepad is open, select Open from the File menu. Select All Files from the Files of type drop-down list to be able to see the LockCode.bat file. Then, you can click Open to open the file.
To protect your password, you can also delete the LockCode.bat file and create it again from the original LockCode.txt file when you need to unlock your files.
NOTE: The LockCode.bat file MUST be in the same directory where the Locker folder was created originally for this method of locking files and folders to work.//
 BY Manjunathan A 

Saturday, 1 March 2014

How to Lock Folder without any software

How to Lock Folder without software 

(for ntfs drive formate only)

Step 1: Go and create a folder in any drive
Ex: "Locker" in "D" drive 
Step 2: Put your files into locker foler (that u have created) 

Step 3: Goto Run->cmd
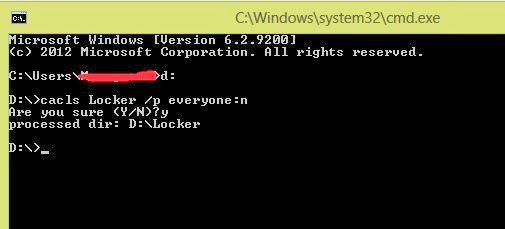
my folder Locker is located in D: drive so locate the folder using dos command (c:\users\john> d:)

Step 4: After you type 
D:>cacls Locker /p everyone:n 
(Locker is folder name)
Are you sure(Y/N): Y

lets test if the folder is Locked!!!
Access denied!!!

Step 5: To unlock the folder Simply change the letter "n" to "f" in our command

Step 6: D:>cacls Locker /p everyone:f